Backing up your OneNote data is a wise move to ensure that your notes are safe in case of unforeseen circumstances such as device failures, accidental deletions, or data corruption. The backup process can differ slightly depending on whether you’re using OneNote for Windows 10 (the Microsoft Store app), OneNote 2016/2013 (the desktop version), or OneNote for Mac. Below, I’ll guide you through the process for each version.
OneNote for Windows 10
For OneNote for Windows 10, Microsoft doesn’t provide a built-in feature to manually back up your notebooks. Instead, all your notebooks are automatically saved to OneDrive. To ensure your data is safe, you can manually download notebooks from OneDrive to your computer:
- Go to OneDrive.com and log in with your Microsoft account.
- Navigate to the
Documentsfolder, where OneNote notebooks are typically stored. - Find your notebook (it will have a
.oneextension or be listed as a OneNote notebook), right-click on it, and selectDownload.
Backing up OneNote for Windows 10 involves a process that’s a bit different from other versions since it doesn’t support direct manual backups. Instead, your notebooks are automatically saved to OneDrive, ensuring that they’re backed up in the cloud.
To create a backup of your OneNote data for additional security, you can manually download the notebooks from OneDrive to your local storage. This is done by navigating to OneDrive.com, logging in with your Microsoft account, and then going to the Documents folder where your OneNote notebooks are stored. Once you find your notebook, you can right-click on it and select the Download option to save a copy to your computer. This method doesn’t provide a traditional backup like OneNote 2016/2013 does, but it does allow you to keep a local copy of your notebooks for extra security or offline access.
OneNote 2016/2013 (Desktop Version)
For the desktop versions of OneNote, you can manually back up your notebooks:
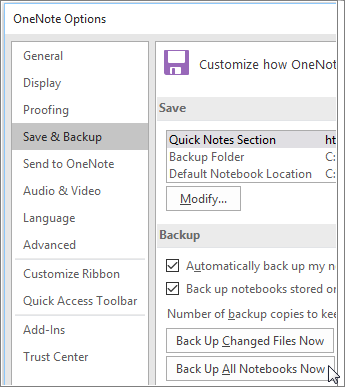
- Open OneNote and go to
File>Options. - In the
Optionsdialog box, selectSave & Backup. - Under the “Save” section, you can see the
Backup Folderlocation. You can change this if you want to save your backups to a different location. - To back up your notebooks immediately, click on
Back Up All Notebooks Nowunder the “Backup” section. - You can also adjust the frequency of automatic backups by changing the
Backupsettings.
To back up OneNote for Windows 2016/2013, you first need to access the options for saving and backing up your data. This is done by opening OneNote and navigating to the File menu where you’ll find Options. Inside the Options dialog box, there’s a Save & Backup section that allows you to view and change the settings related to how OneNote handles your data. Here, you can see the default Backup Folder location, which you might want to note down or change according to where you want your backups to be stored.
There’s an option to Back Up All Notebooks Now, which, when clicked, will immediately start the backup process for all your notebooks. The frequency of automatic backups can be adjusted in this section, allowing you to decide how often OneNote automatically saves a backup of your notebooks.
OneNote for Mac
OneNote for Mac also doesn’t support manual backups in the same way as OneNote 2016/2013 for Windows. Like OneNote for Windows 10, your notes are automatically saved to OneDrive. To back up your notebooks, you would need to manually download them from OneDrive by accessing OneDrive.com, navigating to the folder where your notebooks are stored, and downloading them.
General Tips
- Regular Backups: Regardless of your platform, it’s a good practice to regularly check that your notes are being synchronized and, if possible, to keep local backups in addition to cloud storage.
- Exporting Sections or Pages: In OneNote 2016/2013, you can also export sections or pages of your notebooks as PDFs or OneNote files. This can be done by going to
File>Export, selecting the content you wish to export, and choosing the format.